About IOR Material List
Even though I don’t create photorealistic renders, I often look up IOR values for glass, metal, and other materials. But the databases I find are not always user-friendly, or worse, just incorrect.
To fix that, I spent over 55 hours and built my own, using only reliable sources:
💎 IOR Material List
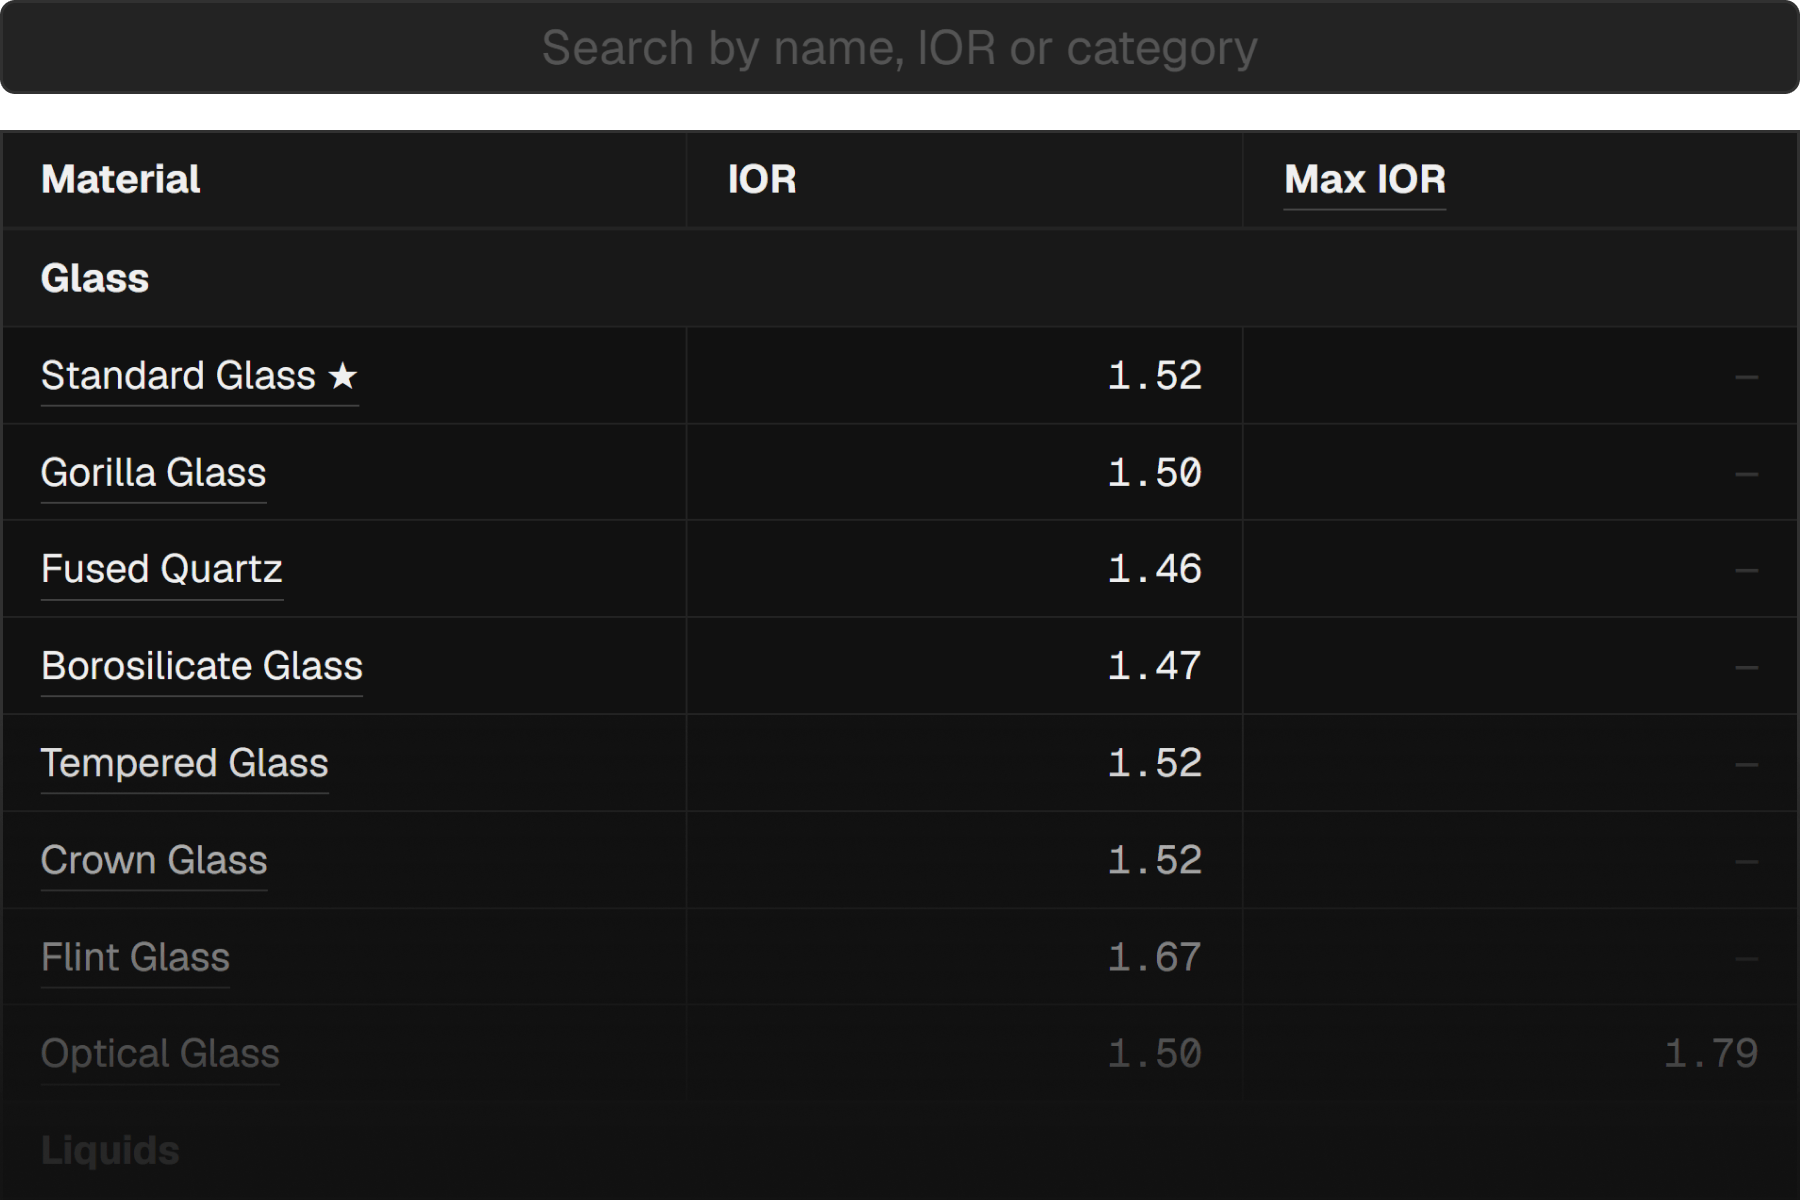
To make it easy to use, I added:
- Smart search by name, synonyms, value, and category
You can findsaltwater by typingsea ,1.34 orliquid - A source link for each material
So you can check exactly where the value came from
- One-click copy for any value
- Labels with ★ for the 20 most common materials
- CSV file with a full dataset of 120+ materials
To keep things accurate, I had to add one more feature:
- Separate table for metals with complex IOR values

To explain why I had to split the materials into two tables, let’s dive into the optics for a bit.
What is IOR?
In 3D, we use index of refraction to control how strong the refraction looks. But physically speaking, it measures how much light slows down when entering a material.
For example, water has an IOR of
Here’s why:
We use the speed of light in a vacuum as the baseline. It has an IOR of
To find how much light slows down, we divide
1 / 1.33 ≈ 0.75 : light in water keeps only 75% of its speed1 − 0.75 = 0.25 : that’s 25% slower
The higher the IOR, the slower the light, and the stronger the refraction.
Why does light bend when it slows down?
Here’s an easy way to picture it.
Imagine roller skating on smooth pavement. Suddenly, your right foot hits grass and slows down. But your left foot keeps rolling, and your whole body starts to turn.
Light behaves the same way. When it hits a denser material at an angle, one side of the wave slows down first, causing it to change direction.
Why can’t IOR be below 1?
IOR less than
A single IOR value below 1 is never physically accurate for materials we use in 3D
Of course, unrealistic material settings are totally fine when they support artistic vision, but they just don’t belong in a physically accurate list.
Simple IOR for common materials
Most materials like glass or water interact with light in a simple way. Light just passes through with almost no absorption, and we only need to describe how much it bends.
A single value is enough for that: the refractive index,
- Ice:
n = 1.31
Light slows slightly, minor refraction - Diamond:
n = 2.42
Light slows more, stronger refraction
In reality, red, green and blue wavelengths bend slightly differently. This effect is called dispersion. But since the difference is usually small, we typically use the
Complex IOR for metals
Metals behave in a more complex way. Light doesn’t pass through them. Instead, most of it reflects, and the rest gets absorbed.
To describe this behavior, a single IOR value is not enough. Instead, we use a complex IOR, made of two parts:
Plus, metals reflect red, green, and blue light differently. That’s what gives them their color tint, like the yellow of gold. To capture this, we need a separate

In metals, light doesn’t travel through the material, so
Technically, we could also use complex IOR values for non-transparent materials like wood or plastic, since they also absorb light. But their absorption is so minimal that one IOR value is accurate enough.
How to use complex IOR?
For most projects, RGB IOR is overkill. Usually it’s enough to set
But if you want to be precise:
- Check how your renderer works with RGB IOR:
- Redshift: use the
IOR to Metal Tints node - Octane: set
Metallic Reflection Mode toRGB IOR - Cycles: in the
Metallic BSDF shader, setFresnel Type toPhysical Conductor
- Redshift: use the
- Find a metal in the IOR list
- Copy the RGB values for
n andκ , and paste them in the same order as shown in the table
Conclusion
It’s surprising how much complexity hides behind a simple value we use so often. That’s exactly why I built this database and wrote this article. To simplify workflows and shed light on what IOR actually means.
If you want to dive deeper into the optics, I recommend these great videos by 3Blue1Brown. I partly used them as sources for this article:
If you’d like to suggest materials to add, feel free to reach out. I’m always looking to improve the list.
About Metronome & FPS to BPM Converter
As a 3D artist, I often need tools that simply don’t exist. So I started creating my own!
When I work on animation without music, I need a rhythm. To find it, I usually search “metronome 120 BPM” on YouTube, download the click track, and use it. After doing this over 10 times, it started to feel clunky.
So I decided to build my own metronome, since I needed it regularly and it was relatively simple to make:
💓 Metronome & FPS to BPM Converter
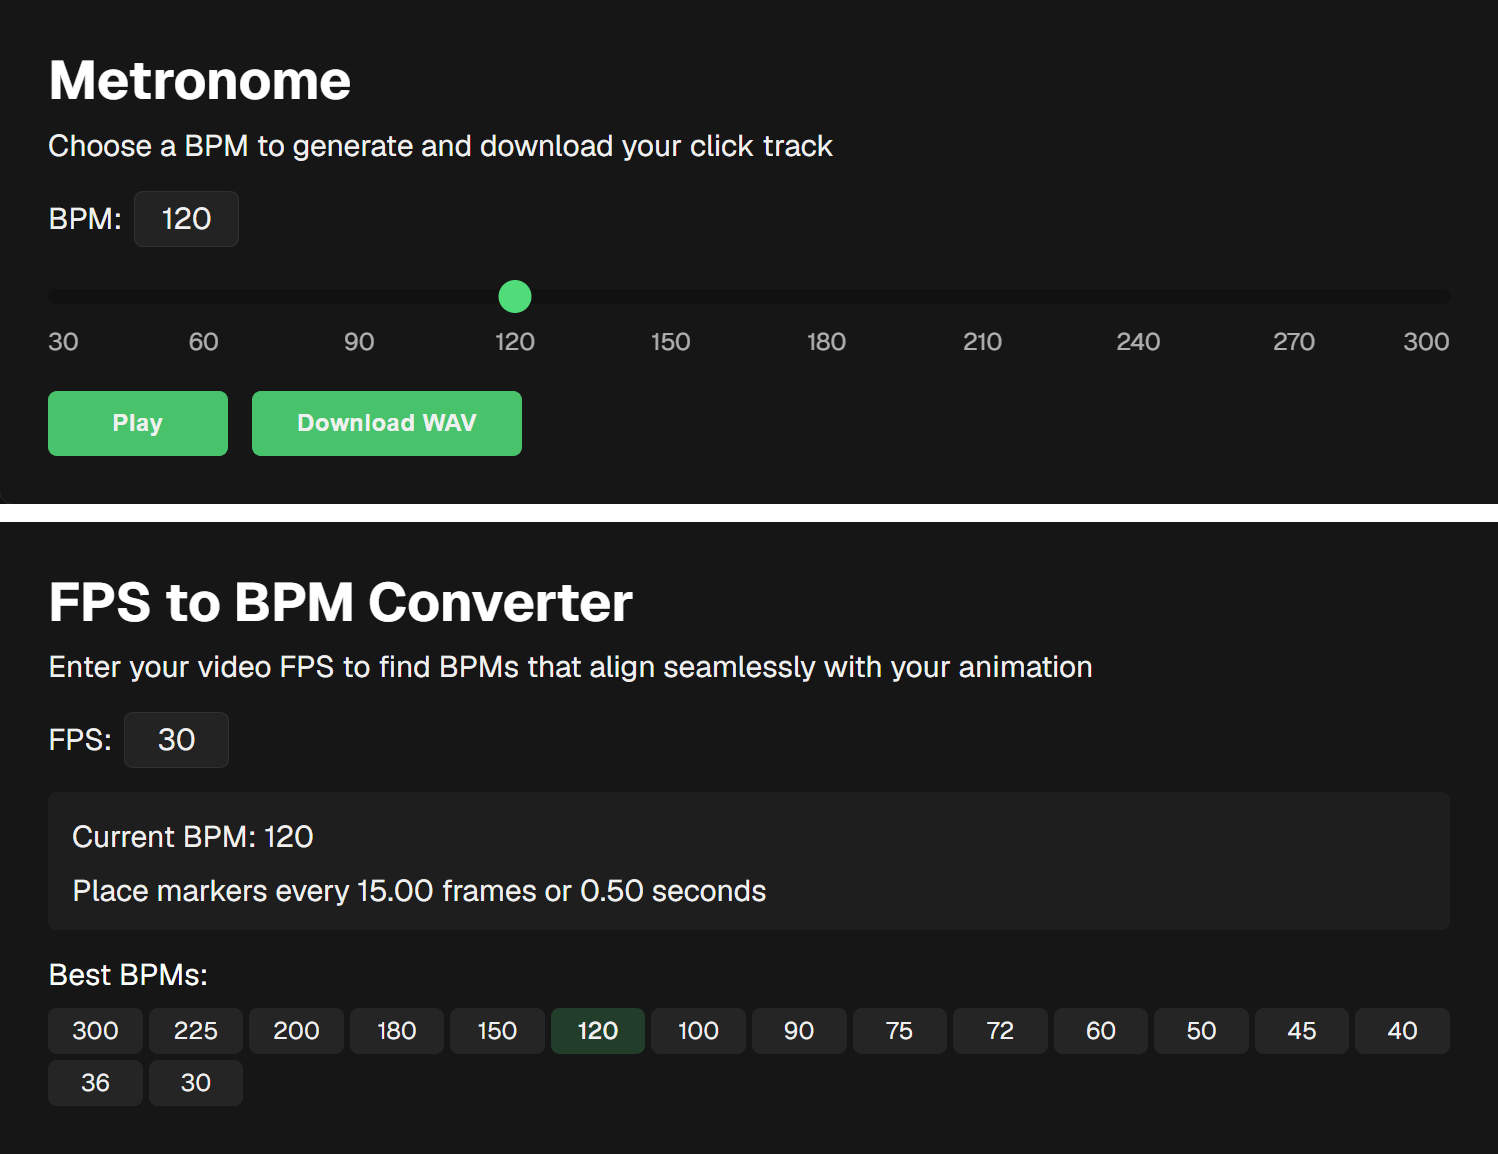
Of course, lots of web metronomes already exist. But I built mine specifically for animation:
- Wide BPM range: Generate click tracks from 30 to 300 BPM
- One-click download: Get a 1-minute WAV file with your chosen BPM instantly
- FPS to BPM converter: Input your frame rate and get BPMs that align perfectly. For example, at 30 FPS, 120 BPM gives you a beat every 15 frames
- Frame-perfect timing: Beats begin exactly at frame 0, not a random frame like many YouTube videos
One less workaround in my workflow, and hopefully yours too. I’ll keep building tools for problems that bug me enough to fix and sharing them to help others.
Display Custom Material Controls: Cinema 4D, Redshift
When working with complex Redshift materials, it’s often useful to expose a few selected settings in the
It’s actually quite easy to set up, but the process isn’t very intuitive. Here’s a quick animation and a step-by-step breakdown of how to do it using a
- Create a Redshift material and open the
Node Editor - Create a
Group node — this will be your container for all custom inputs - Right-click the
Group node and selectAdd Input → Add New Input - Double-click the input to rename it to the parameter you want to control (in my case, IOR)
- Right-click the new input and select
Edit Port - Set the
Data Type you need. ChooseFloat for numbers. Close the window when done - Double-click the
Group node to open it - Drag the dot next to the input name into an empty space on the grid. In the popup that appears, choose
Add New Output - Go back to the main material and connect the new output port from the
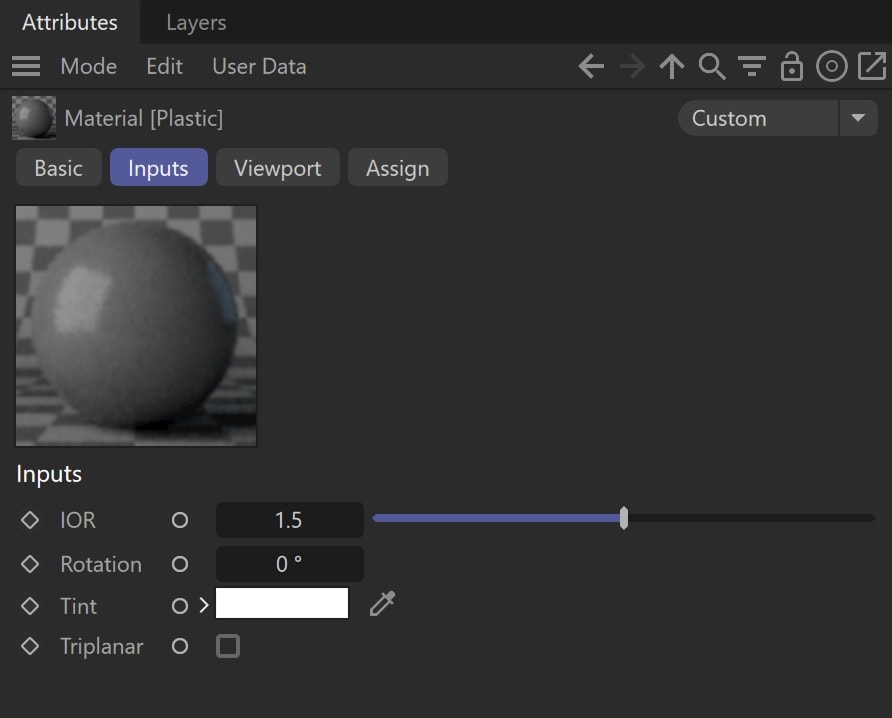
Group node to the parameter you want to control (for example, IOR on the RS Material) - In the
Node Editor , select theGroup node and go toNode → Start Node in the top menu.
This will make your custom controls appear in theAttribute Manager
Now, whenever you select the material in the
Using this approach, you can add additional inputs to the same
Organize Your Scene with Custom Icons: Cinema 4D
A great way to keep your projects organized in Cinema 4D is not just to group objects into nulls, but to assign custom icons to them. When each null has a unique icon for cameras, lights, and other elements, the scene becomes clearer and easier to navigate.
Assign icons to null objects
Setting this up is simple:
- Create null objects for different groups: geometry, cameras, lights, etc.
- Go to the Maxon icons page
- Search for an icon that fits your needs and copy its
Integer Value (this is the icon’s ID) - Select the null and paste the
ID into theBasic → Icon field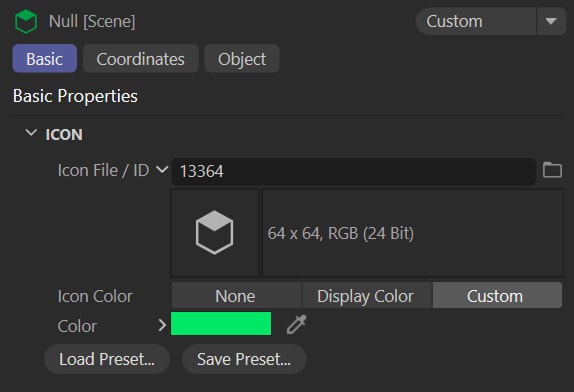
- Assign colors to the nulls to make the separation between groups clearer
- Repeat for all nulls to create a well-organized, visually clear scene
Bonus tip: save this setup as your default scene
Instead of starting with an empty project every time you open Cinema 4D, set up your scene once and save it as your default startup file:
- Arrange your scene with labeled nulls, assigned icons, and colors
- Go to
Window → Customization → Save as Default Scene
Now, every time you start a new project, you’ll have a clean, well-organized scene ready to go!
After Effects Expressions Cheat Sheet
I’ve put together a list of After Effects expressions that simplify my workflow. You won’t find basics like
Most of these expressions are taken from the web and adapted to fit my needs, with only a few being entirely my own. I’ve included links to credit the authors where relevant.
Adaptive Text Box
Resize a shape layer dynamically to match its text length.
Create a rectangle shape and add a text layer above it.
Apply this expression to the
margin_width = 60;
margin_height = 40;

text_width = thisComp.layer(index-1).sourceRectAtTime().width;
text_height = thisComp.layer(index-1).sourceRectAtTime().height;

box_width = text_width + margin_width*2;
box_height = text_height + margin_height*2;

[box_width, box_height]For multi-line text, apply this additional expression to the
x = value[0];
y = content("Rectangle 1").content("Rectangle Path 1").size[1]/2;
[x,y]
Animated Wiggle
Easily animate wiggle using two sliders: one controls the frequency, and the other controls the amplitude. For the best results, animate only amplitude.
Add two
w_freq = effect("Slider Control")("Slider");
w_amplitude = effect("Slider Control 2")("Slider");

wiggle(w_freq,w_amplitude)
Looping Wiggle
With this expression, wiggle starts and ends at the same point.
If it doesn’t loop correctly, it’s likely because the loop time is too short for wiggle to return to the starting point. Just increase
freq = 1;
amp = 65;

startTime = 0; // Loop start time
loopTime = 3; // Loop duration in seconds

t = (time+startTime) % loopTime;
wiggle1 = wiggle(freq, amp, 1, 0.5, t);
wiggle2 = wiggle(freq, amp, 1, 0.5, t - loopTime);

linear(t, 0, loopTime, wiggle1, wiggle2)Pin Shape Layer to One Side
Keep one of the shape’s sides fixed while adjusting the
Apply this expression to the
pinTo = "left"; // top, bottom, right or left
chosenShape = content("Rectangle 1").content("Rectangle Path 1");

if (pinTo == "top"){
     x = chosenShape.position[0];
     y = chosenShape.position[1]+chosenShape.size[1]/2;
}

else if (pinTo == "bottom"){
     x = chosenShape.position[0];
     y = chosenShape.position[1]-chosenShape.size[1]/2;
}

else if (pinTo == "right"){
     x = chosenShape.position[0]-chosenShape.size[0]/2
     y = chosenShape.position[1]
}

else if (pinTo == "left"){
     x = chosenShape.position[0]+chosenShape.size[0]/2;
     y = chosenShape.position[1]
}

[x,y]
Rolling Circle and Square Rig
Rolling Circle
Apply this to the
transform.position[0]-(content("Ellipse 1").content("Ellipse Path 1").size[0]/2)-transform.position[0]/2Rolling Square
This expression works with shapes, layers and compositions.
Apply the expression to the
targetLayer = thisLayer;
squareSize = targetLayer.sourceRectAtTime().width;
squareDiag = (Math.sqrt(2)*squareSize)/2/3.5;

try{
    squareOffset = effect("Slider Control")("Slider");
}

catch(err) {
    squareOffset = 0;
}


rot=transform.rotation;
scl=transform.scale[0]/100;
w=(squareSize/2)*scl;
r=(degreesToRadians(rot))*2;
t=transform.position;

[t[0]+w*rot/45,t[1]-(Math.abs((squareDiag+squareOffset)*Math.sin(r)))*scl];
Based on Mikey Borup’s expression
Stepped Rotation
An alternative to
Apply to the
angle = 15; // Rotation angle per second
rotateDuration = 10; // Duration of rotation in frames

rotateDurationFr = rotateDuration/(1/thisComp.frameDuration);

wholeSecond = Math.floor(time);
startAngle = wholeSecond * angle;
ease(time, wholeSecond, wholeSecond + rotateDurationFr, startAngle, startAngle + angle)Advanced Stepped Rotation
A more customizable version of the stepped rotation expression.
Apply to the
angle = 15; // Rotation angle per second
rotateDuration = 6; // Duration of rotation in frames
timeStop = 5; // Stop duration between rotations
offset = 0; // Offset of the initial frame

fr = timeToFrames(time)+offset;

cycle = timeStop+rotateDuration;
n = Math.floor(fr/cycle);
cur_phase = fr-n*cycle;

if((cur_phase)>timeStop){
angle*n+(cur_phase-timeStop)*angle/rotateDuration;
}
else{
angle*n;
}Maintain Scale When Parented
When you parent one object to another and scale the parent, both layers will scale. This expression prevents the child layer from scaling and only moves it by position.
Apply to the layer’s
s = [];
ps = parent.transform.scale.value;
for (i = 0; i < ps.length; i++){
s[i] = value[i]*100/ps[i];
}
sCheckbox Switcher
Toggle any value with a checkbox.
Add a
Apply this expression to a parameter you want to control:
if (effect("Checkbox Control")(1) == 0) 0 else 100Shape Layer Loop
Standard
Apply to the
try{
pingPong = false; // Set to true if pingPong is needed

timeStart = thisProperty.key(1).time;
duration = thisProperty.key(thisProperty.numKeys).time-timeStart;
quant=Math.floor((time-timeStart)/duration);

if(quant<0) quant = 0

if(quant%2 == 1 && pingPong == true){
t = 2*timeStart+ (quant+1)*duration - time;
}

else{
t = time-quant*duration;
}
}
catch(err){
t = time;
}
thisProperty.valueAtTime(t)Range Mapper
Remap input values to a different output range.
Add a
input = effect("Slider Control")("Slider");

inputLow = 0;
inputHigh = 100;
outputLow = 450;
outputHigh = 650;

linear(input,inputLow,inputHigh,outputLow,outputHigh)Maintain Stroke Width When Scaling
Keep a constant stroke width when scaling a shape.
Apply this to the
value / length(toComp([0,0]), toComp([0.7071,0.7071])) || 0.001;Counters
A collection of 6 counter expressions for various use cases. All of these counters are basically text layers linked to slider controls, which can be keyframed.
1. Simple Counter
Displays numbers with a fixed decimal place.
Add a
parseFloat(effect("Slider Control")("Slider")).toFixed(2)2. Comma Separator Counter
Replaces the decimal point with a comma. If you happen to need a similar setup with more customization, it’s right here.
Add a
c = parseFloat(effect("Slider Control")("Slider")).toFixed(2);
c.toString().replace(".", ",")
3. Counter with Additional Symbols
Adds symbols like
Add a
"+"+parseFloat(effect("Slider Control")("Slider")).toFixed(2)+"%"4. Counter with Leading Zeros
Displays numbers like
Add a
zerosAmount = 3;

var slider = effect("Slider Control")("Slider");

function padStart(string, targetLength, character) {
	string = (string instanceof String) ? string : string.toString();
	targetLength = targetLength >> 0;
	character = character || ' ';

	while (string.length < targetLength) {
		string = character + string;
	}

return string;
};

if (slider >= 0) {
zeroAmount = zerosAmount + 1;
paddedString = padStart(parseFloat(slider.value).toFixed(0), zerosAmount, '0');
}

else {
paddedString = '-0'+padStart(parseFloat(slider.value).toFixed(0)*-1, zerosAmount, '0');
}

paddedString;
Based on Tomas Sinkunas’ expression
5. Digit Grouping Counter
Adds spacing to group digits, turning
Add a
num = parseFloat(effect("Slider Control")("Slider")).toFixed(0);
str = isNaN(num) ? "" : (num * 1 + "");
str.replace(/(\d)(?=(\d\d\d)+([^\d]|$))/g, '$1 ');6. Large Number Counter:
For values above 1,000,000, use
Add an
number = Math.round(effect("Angle Control")("Angle")/360);

n="" + number;
s="";
for(i=0, l=n.length; i<l;  i++){
    if(s && s!="-" && (l-i)%3 ==0)
                s+=" ";
        s += n[i];
}
s;Various Mini Expressions
And finally, 4 useful mini-expressions that often come in handy.
1. Link to Layer Above or Below
It’s not a complete expression, but only part of it. Instead of linking one layer to another using its name, it is sometimes more convenient to link to a layer above or below the layer with the expression.
In the example, I link the box’s layer position to any layer above. To parent to a layer below instead, use
thisComp.layer(index-1)2. Constantly Accelerating Rotation
Add this to
time*time*time*time3. Keyframes with time*n
Add constant motion while still allowing keyframes.
value+time*114. Link Gradient Ramp to Layer
Prevent a gradient ramp from shifting when moving the layer. Apply to the
toComp(value)That’s it! This collection includes 23 expressions I use regularly.
📁 The project file with all of them is available for free.
Fix Noise Loop: Cinema 4D Redshift
When you create a Redshift material with
Disable Time Behavior
- Go to
Render Settings (Ctrl+B) - Switch to
Advanced mode - Go to
Redshift → System → Legacy and disableTime Behavior
Check Loop Period
- Ensure that the FPS in both
Project Settings (Ctrl + D) andRender Settings (Ctrl + B) match - The
Loop Period for the noise is calculated in seconds. So it should equal the total number of frames divided by the FPS. For example, if your timeline has 60 frames and your FPS is 30, theLoop Period should be 2 seconds.
After these adjustments, your noise should loop correctly.
Bonus tip: Since the first and last frames are identical in a loop, you can render one frame less to avoid repeating the same frame and achieve a smoother transition.
Fix Extrude Shading Issues: Cinema 4D
The
To fix shading issues, switch the

Intro
When I’m working in Cinema 4D, I frequently find myself googling solutions to problems or refreshing my memory on how to do something.
Sometimes the answer is right in the first search result, but other times I end up watching two-hour videos or digging through dead forums in Google’s cache to find an answer to what seems like a simple question. And when I do find a solution, at best, I share it in a work chat, where it reaches just a few people.
So, I decided to create this library to compile useful tips and tricks that can make life easier.